I decided it was time to give my old bus tracker a bit of a glow-up. I wanted something more than just a boring button, and I’ve had this idea kicking around for a “hands-free” UI for a while. Honestly, I have these ideas all the time, and with the AI models we have now, it’s so easy to just mess about and actually test them out without getting bogged down.
The Problem with Touch (and Screens)
Since this was going into my “coffee zone,” I wanted something visual, but I really didn’t want to shell out for a fancy touch screen. I happened to have an ultrasonic sensor sitting in an old Arduino starter kit. I figured, why not use that?
I spent about £14 on a small ESP board that came with its own little screen, and the plan was born: a super cheap “computer” that I could navigate just by waving my hand. Simple, easy, and the whole setup cost me about £15.
Why I Love Rapid Prototyping
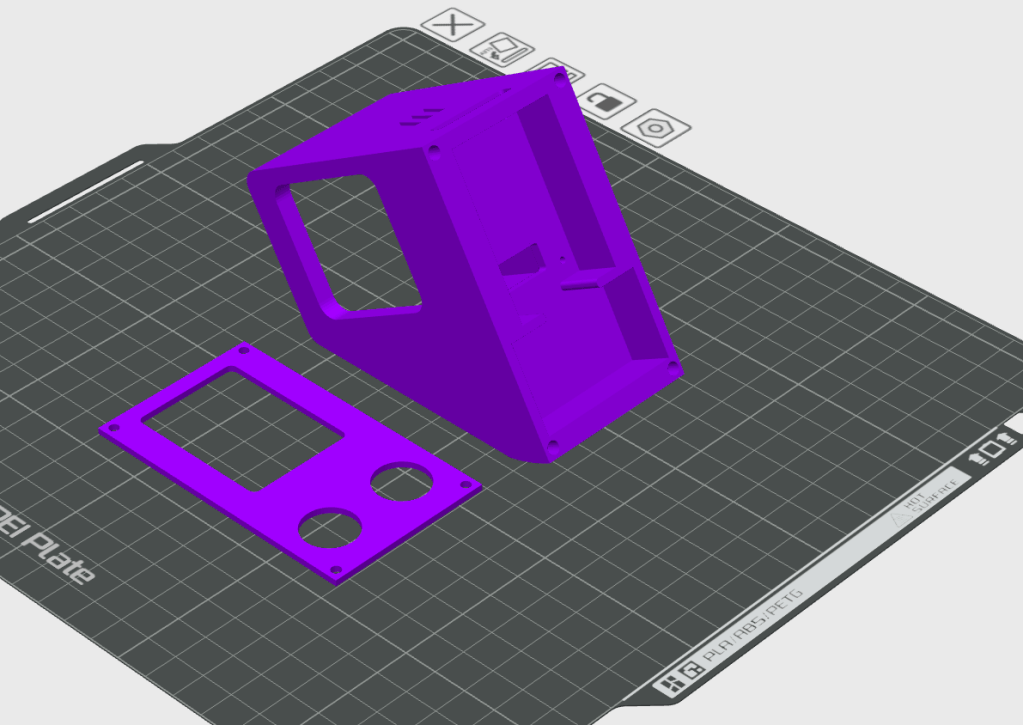
The best part? The entire project took me less than 24 hours from start to finish. I did one test print for the case, refined it, and did a final print,each one only taking about two hours. The app itself took maybe two hours of going back and forth with the AI, tweaking the UI and smoothing out the algorithm so the hand-tracking didn’t feel jittery.
Going from “hey, wouldn’t this be cool?” to a finished thing on my desk in that amount of time is just mad to me. I’ve really been enjoying 3D modeling lately; if I get stuck, I just take a screen grab, send it over to Gemini, and it helps me fix the issue. It’s a great way to learn something new while actually making progress.
The Workflow: The Power of a Good Spec
There’s a saying I love: “If I had six hours to chop down a tree, I would spend four hours sharpening my axe.”
I’ve found that I now spend way more time planning what I want to do than actually doing. I do that by writing a detailed “spec.” This spec is what the AI uses to build exactly what I want. I try to provide all the context it needs,the pins, the logic, the “vibe”,before I even ask for a line of code. I have not included the TFL API stuff as that I had in another document.
For this project, the spec was short and to the point. For the complex agents I build at work, those specs can hit 5 or 6 pages pretty quickly! Even with a good spec, I still did a bit of back-and-forth, but each change took about a minute. I’d tweak the logic, spend two minutes loading it onto the device, and test it immediately.
Check out the video below to see the final result in action!
What Does the App Actually Do?
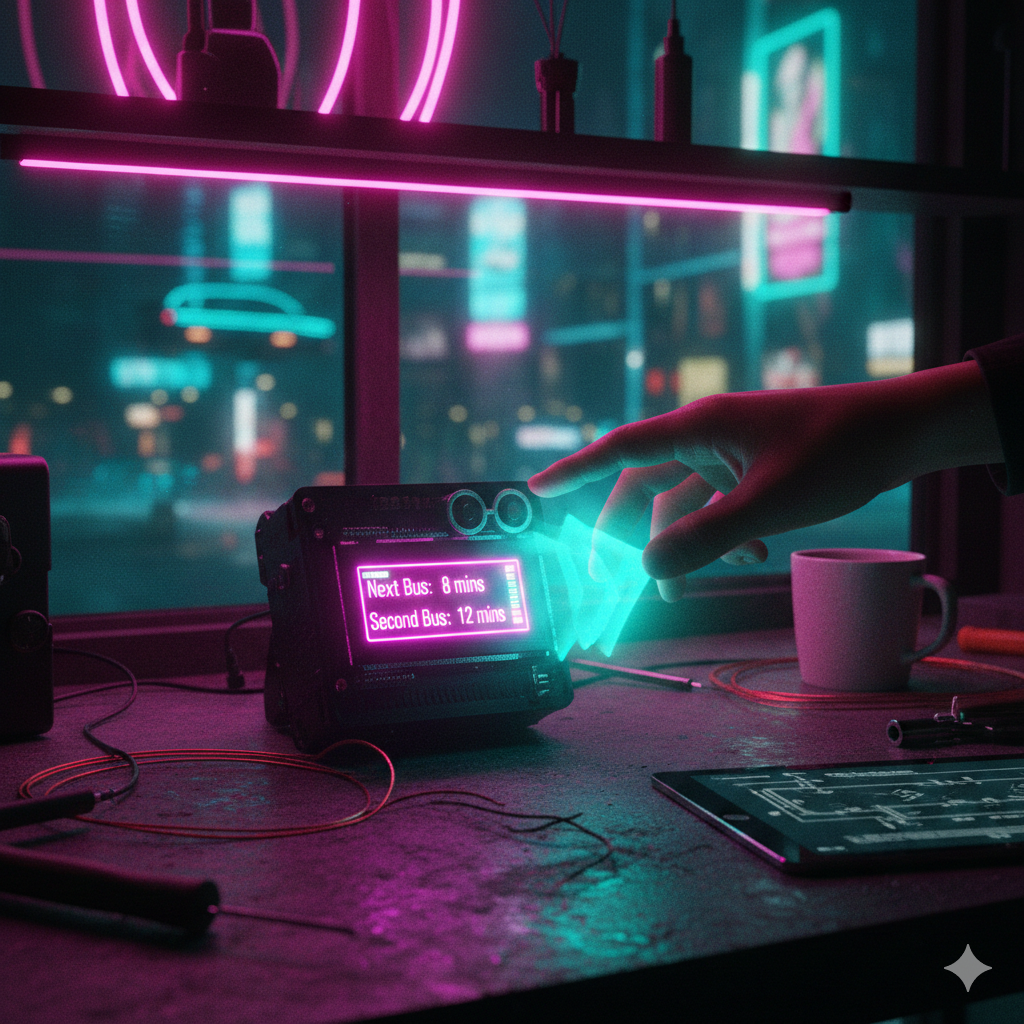
By combining that cheap ESP32-S3 with the ultrasonic sensor, I created a completely touchless interface. Instead of tapping a screen with messy coffee hands, I just float my hand in the air.
- Scrolling: Moving my hand closer or further from the sensor scrolls the menu.
- Selecting: Simply hovering (dwelling) over an option selects it.
When it’s just sitting there in standby, it’s a glanceable dashboard showing me when my next bus is due. With a wave of my hand, it wakes up, and I can set a timer, toggle my WLED lighting setup, or check live TfL arrivals with color-coded alerts.
The Build List (The “Cheap” Part)
If you want to try something similar, here is the damage:
- £13.50: ESP32-S3 board with 2″ IPS display
- £2.00: Ultrasonic distance sensor (HC-SR04)
- Some wire: (Probably found in your “junk” drawer)
- 3D Printed Case: (Less than £1 of filament)
Total: £16.50
The “Secret Sauce” (The Spec)
In case you’re curious how I prompted the AI to build this, here is the version 2 spec I used. It covers everything from the “dead zones” in the sensor readings to the specific colors for the bus timings.
Agent Spec
Spec v2 System OverviewThis project is an ESP32-S3 based application that uses an ultrasonic sensor to create a touchless, distance-based navigation interface. The user interacts with the device by moving their hand closer and further from the sensor.Key Features: Unlock UI: Proximity-based wake-up (< 3cm). Standby Mode: Displays useful info (Lights, Bus) when idle. Menu Navigation: Distance-mapped cursor to select Timer, Lights, or Bus Times. Smart Integrations: Controls WLED lights and fetches TfL Bus times. Display Settings & HardwarePins I am using:#define TFT_SCK 39#define TFT_MOSI 38#define TFT_MISO GFX_NOT_DEFINED#define TFT_DC 42#define TFT_CS 45#define TFT_RST 0#define TFT_BL 1#define US_TRIG 17#define US_ECHO 18 Core Interaction Logic Boot Sequence Splash Screen: Visuals: 3 Rotated Rectangles at -13 degrees (White on Black). Duration: Minimum 2 seconds. Smart Delay: Remains active until WiFi is connected AND valid Bus Data is retrieved. Sensor Warmup: First 2 seconds of sensor readings are ignored to prevent false triggers. Unlock & Standby Standby Mode (Default): Display: Shows current WLED Status (Color/Effect) and Next Bus Time. Updates: Bus info refreshes every 1 minute. Behavior: Screen is ON but showing passive info. WLED Integration: Loading State: Sets WLED strip to Blue Breathing Animation while fetching data. Status Indication: Sets WLED strip color based on bus arrival time (Red/Green/Orange). Unlock Sequence: Trigger: Hand must come closer than 3cm to the sensor. Feedback: "Activate" visualization (e.g., circle filling) to confirm wake-up. Action: Transitions to Main Screen (Homepage). Timeout (Auto-Lock): If no interaction/selection is made for 30 seconds, the device returns to Standby Mode. Distance Zones (Active Mode) Usable Zone (< 15cm): This is the active interaction area. The screen content (menus, sliders) is mapped to this physical distance range. Base/Inactive Zone (> 15cm): Represented by a Grey Base at the bottom of the screen. Interaction Mechanics Navigation: Menu options are vertically stacked and split the 15cm "Usable Zone" proportionally. Selection ("Dwell Time"): To select an item, the user must hold their hand steady within the target zone for 1 second. Smoothing & Stability: EMA Smoothing: Use Exponential Moving Average (Alpha ~0.15). Hysteresis: Buffer (+/- 0.5cm) at zone boundaries. UI Styling Text Alignment: Centered. Animations: Smooth transitions, sliders animating from bottom. Screens & Menu Structure 1. Main Screen (Homepage) Layout: Split into 3 vertical zones (each ~5cm physical height). Options: Top: "Timer" Middle: "Bus Times" Bottom: "Lights" Behavior: Hover highlights; Hold 1s selects. 2. Timer Screen Initial State (Idle): Visuals: Displays current timer (MM:SS) in Large Font. Active State (Menu Open): Zones: Top (0-5cm): Dead Zone. Middle (5-10cm): "Reset". Bottom (10-15cm): "Back". 3. Light Settings Screen Layout: Split into 3 zones. Options: Rainbow: Sets WLED to rainbow cycling. Solid: Sets WLED to solid color. Back: Returns to Main Screen. Logic: Sends HTTP request to WLED IP. 4. Bus Times Screen Display: Shows Time to Next Bus (e.g., "7 mins"). Background/Element color reflects status. Logic (Derived from Previous App): Red: <= 5 mins OR > 12 mins. Green: 6 - 9 mins. Orange: 10 - 12 mins. WLED Control: Also updates the WLED strip color to match the status. Updates: Fetches data on entry and periodically (e.g., every 30s). Interaction: Back zone (bottom) or gesture to return home.

Leave a comment