This one is a bit different. Less about AI doing something clever and more about using AI as a proper engineering partner to build something physical. And honestly, it might be my favourite project so far.
The 8-Hour Smoke That Broke Me
I love a long cook. There’s something deeply satisfying about a brisket or a rack of ribs that’s been going for hours. But to do it properly, you need to track your temperatures. That’s why I had a Bluetooth BBQ thermometer with six probes. It had an app. It worked… okay.
The problem hit me during an 8-hour smoke. I wandered into the living room and the Bluetooth dropped. No big deal, I thought. I’ll reconnect when I go back out.
Except when I did, all the data from that period was just gone. Wiped. Turns out the temperature history was stored in the app, not on the thermometer itself. So the moment you lost connection, that whole chunk of your cook vanished. No graph. No record. Nothing.
And notifications? Forget it. If you’re out of Bluetooth range when you hit your target temperature, your phone stays silent. For a long cook, where the whole point is to be able to relax inside and keep an eye on things remotely, this was genuinely useless.
The £250 Reality Check
So I started shopping. Found a great Wi-Fi thermometer that solved all of these problems. Logs to the cloud so you can always have access to your data. Works over Wi-Fi so it reaches anywhere in the house. Graphs, notifications, the works.
£250.
I sat with that for about 30 seconds before I thought: I’ve got ESP boards sitting in a drawer. I’ve got the probes from the old Bluetooth thermometer already. What would it actually cost to build this myself?
Turns out: £20. A few extra components, ordered, arrived next day.
How I Built It (With Claude Doing the Heavy Lifting)
The key to making this not a nightmare is starting with a spec (I will continue to say this btw). Before writing a single line of code or touching any wires, I spent about 30 minutes writing out exactly what I wanted. What features, why I was building it, what the improvements over the old one needed to be. What features i need and what the hardware was going to look like, what was getting wired to what and so on.
A few things were non-negotiable:
- Temperature history saved to a micro SD card, no phone required
- Wi-Fi so I can access it from anywhere in the house
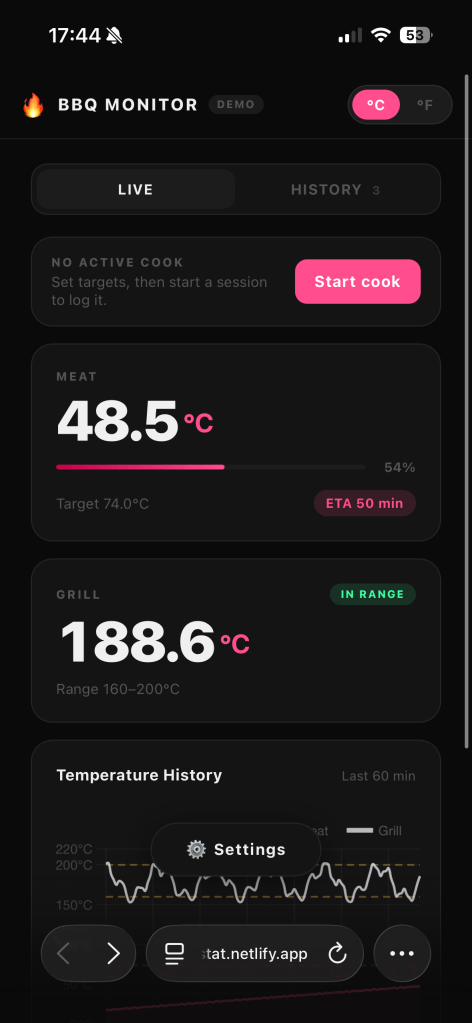
- Proper graphs so I can see the full picture of a cook
- Notifications that actually work
I went back and forth with Claude for about 5-10 mins to refine the spec. Then the build started.
My workflow:
- UI first. Instead of trying to wire everything up and build it all at once, I got Claude to build the front end first with fake data. Graphs, history view, favourites, notes. I could see exactly what it was going to look like before a single wire was connected.
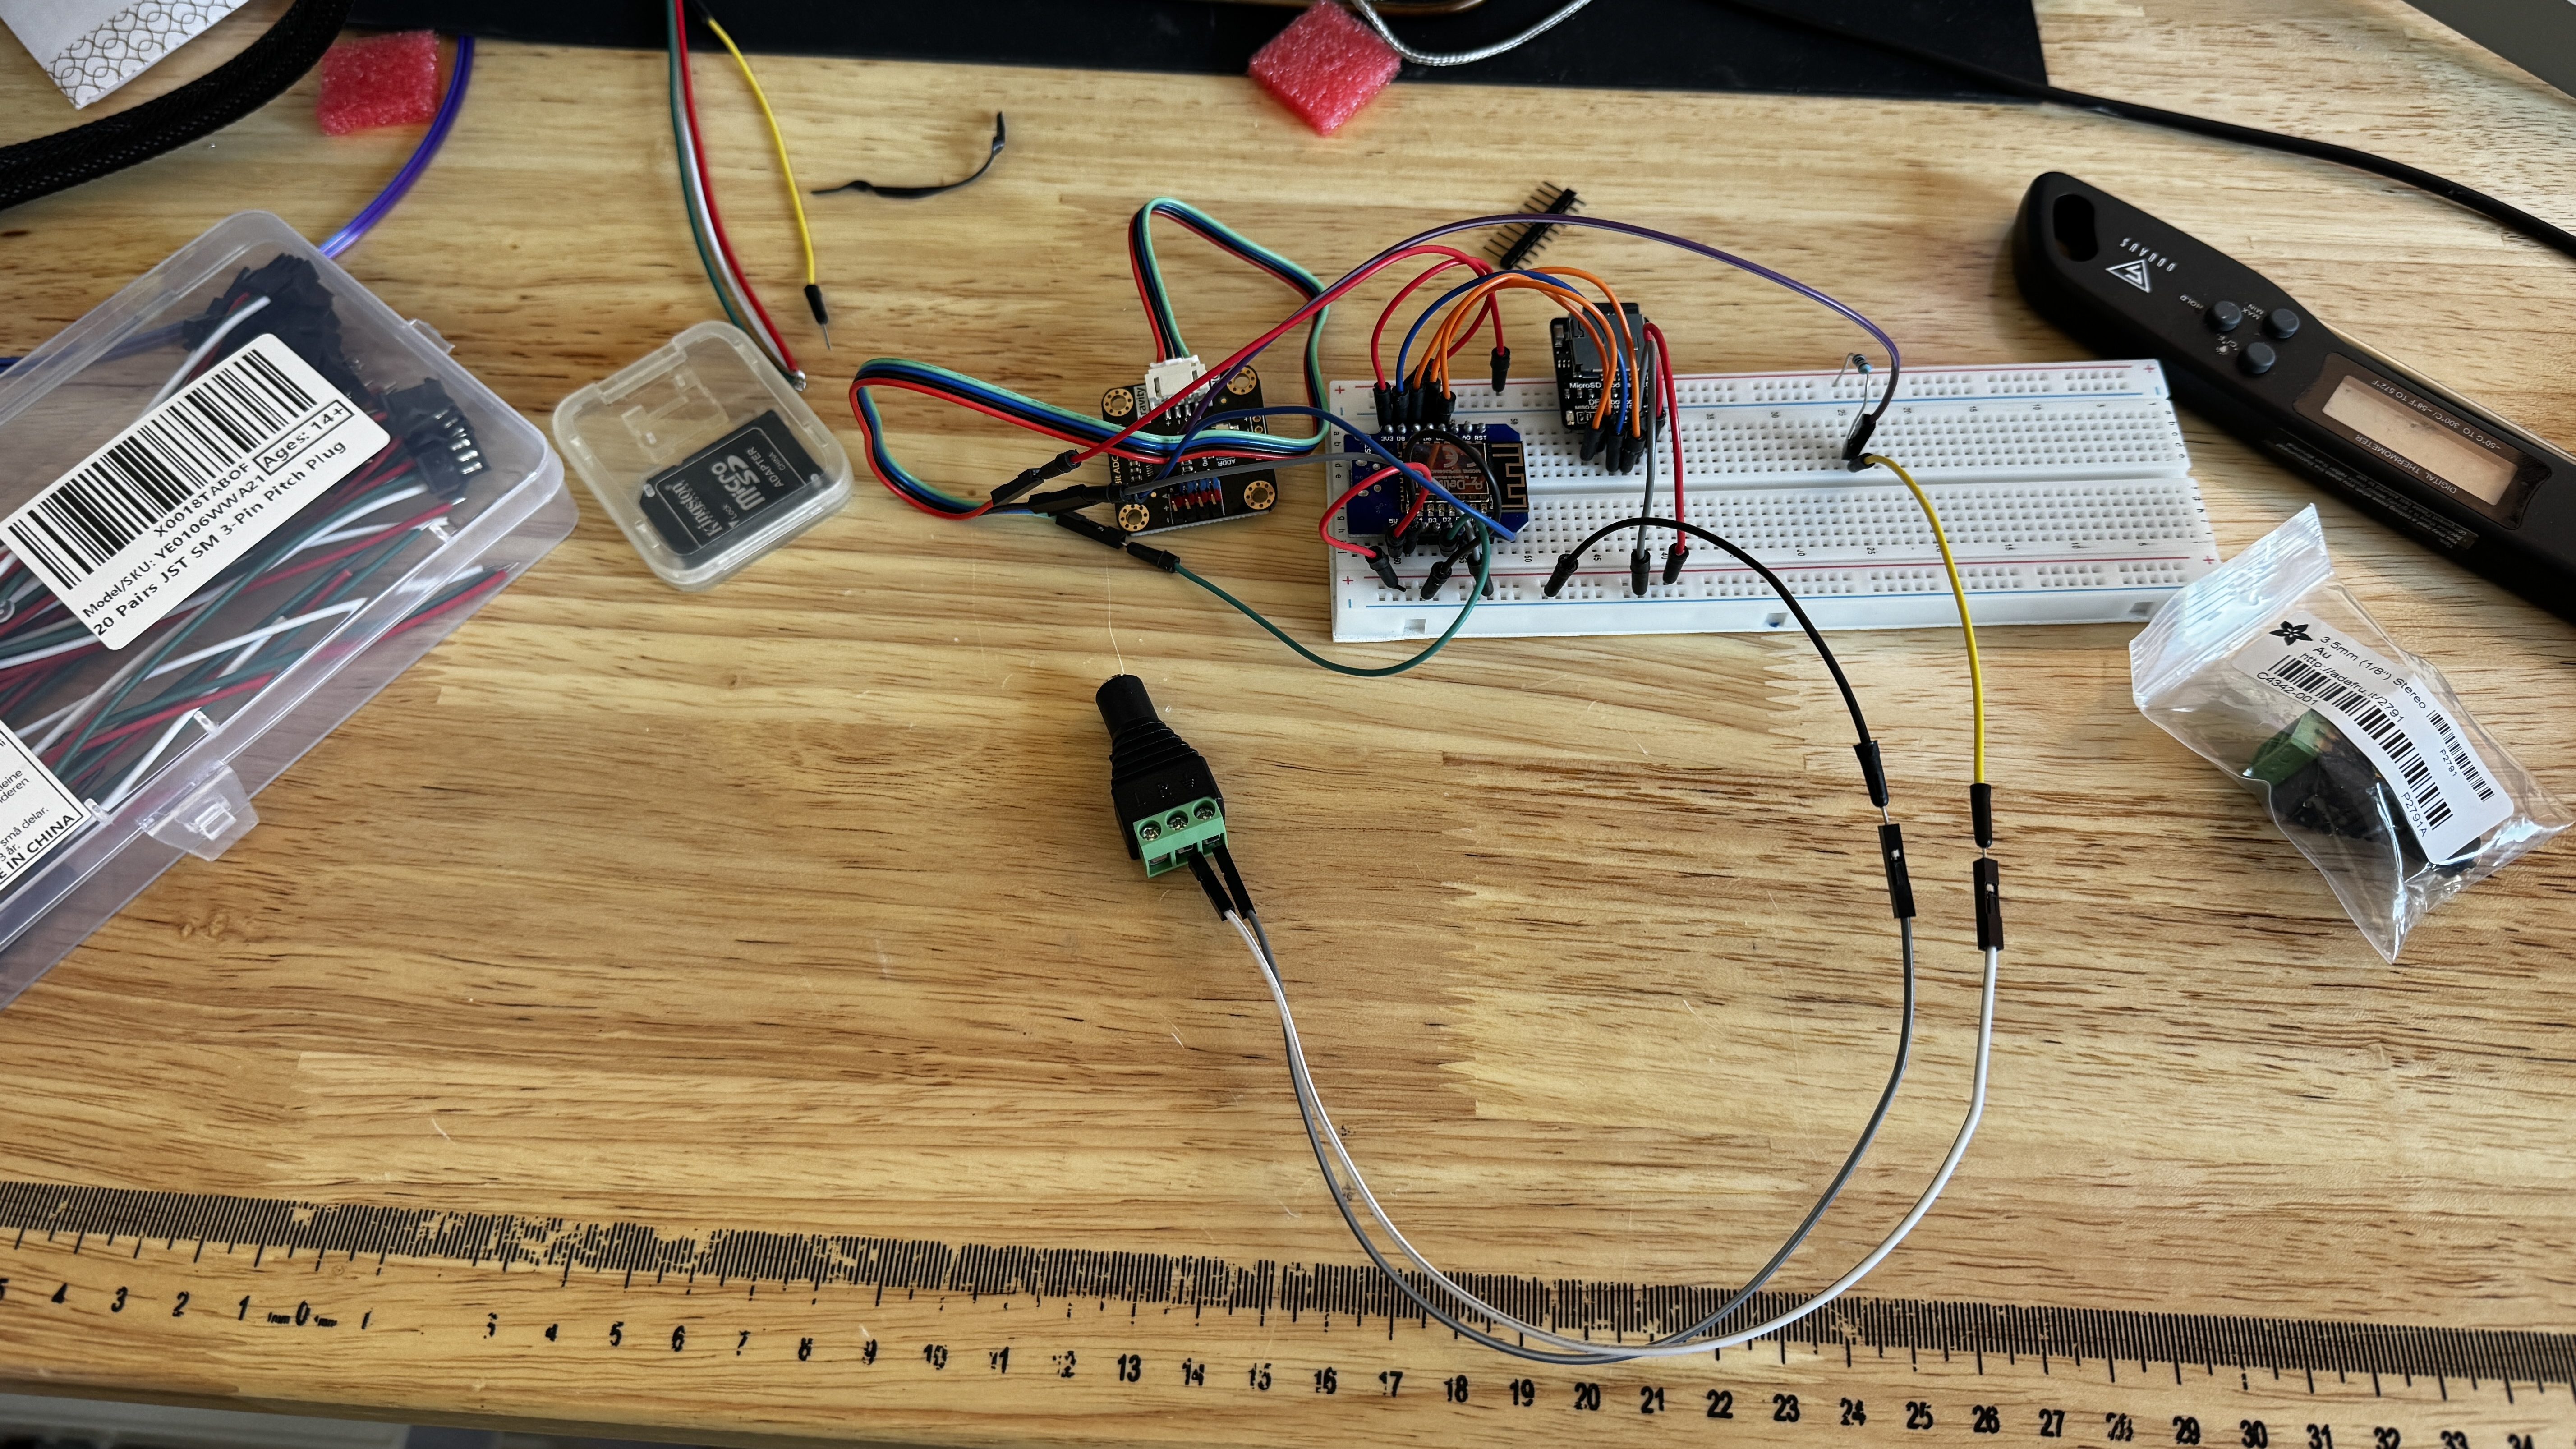
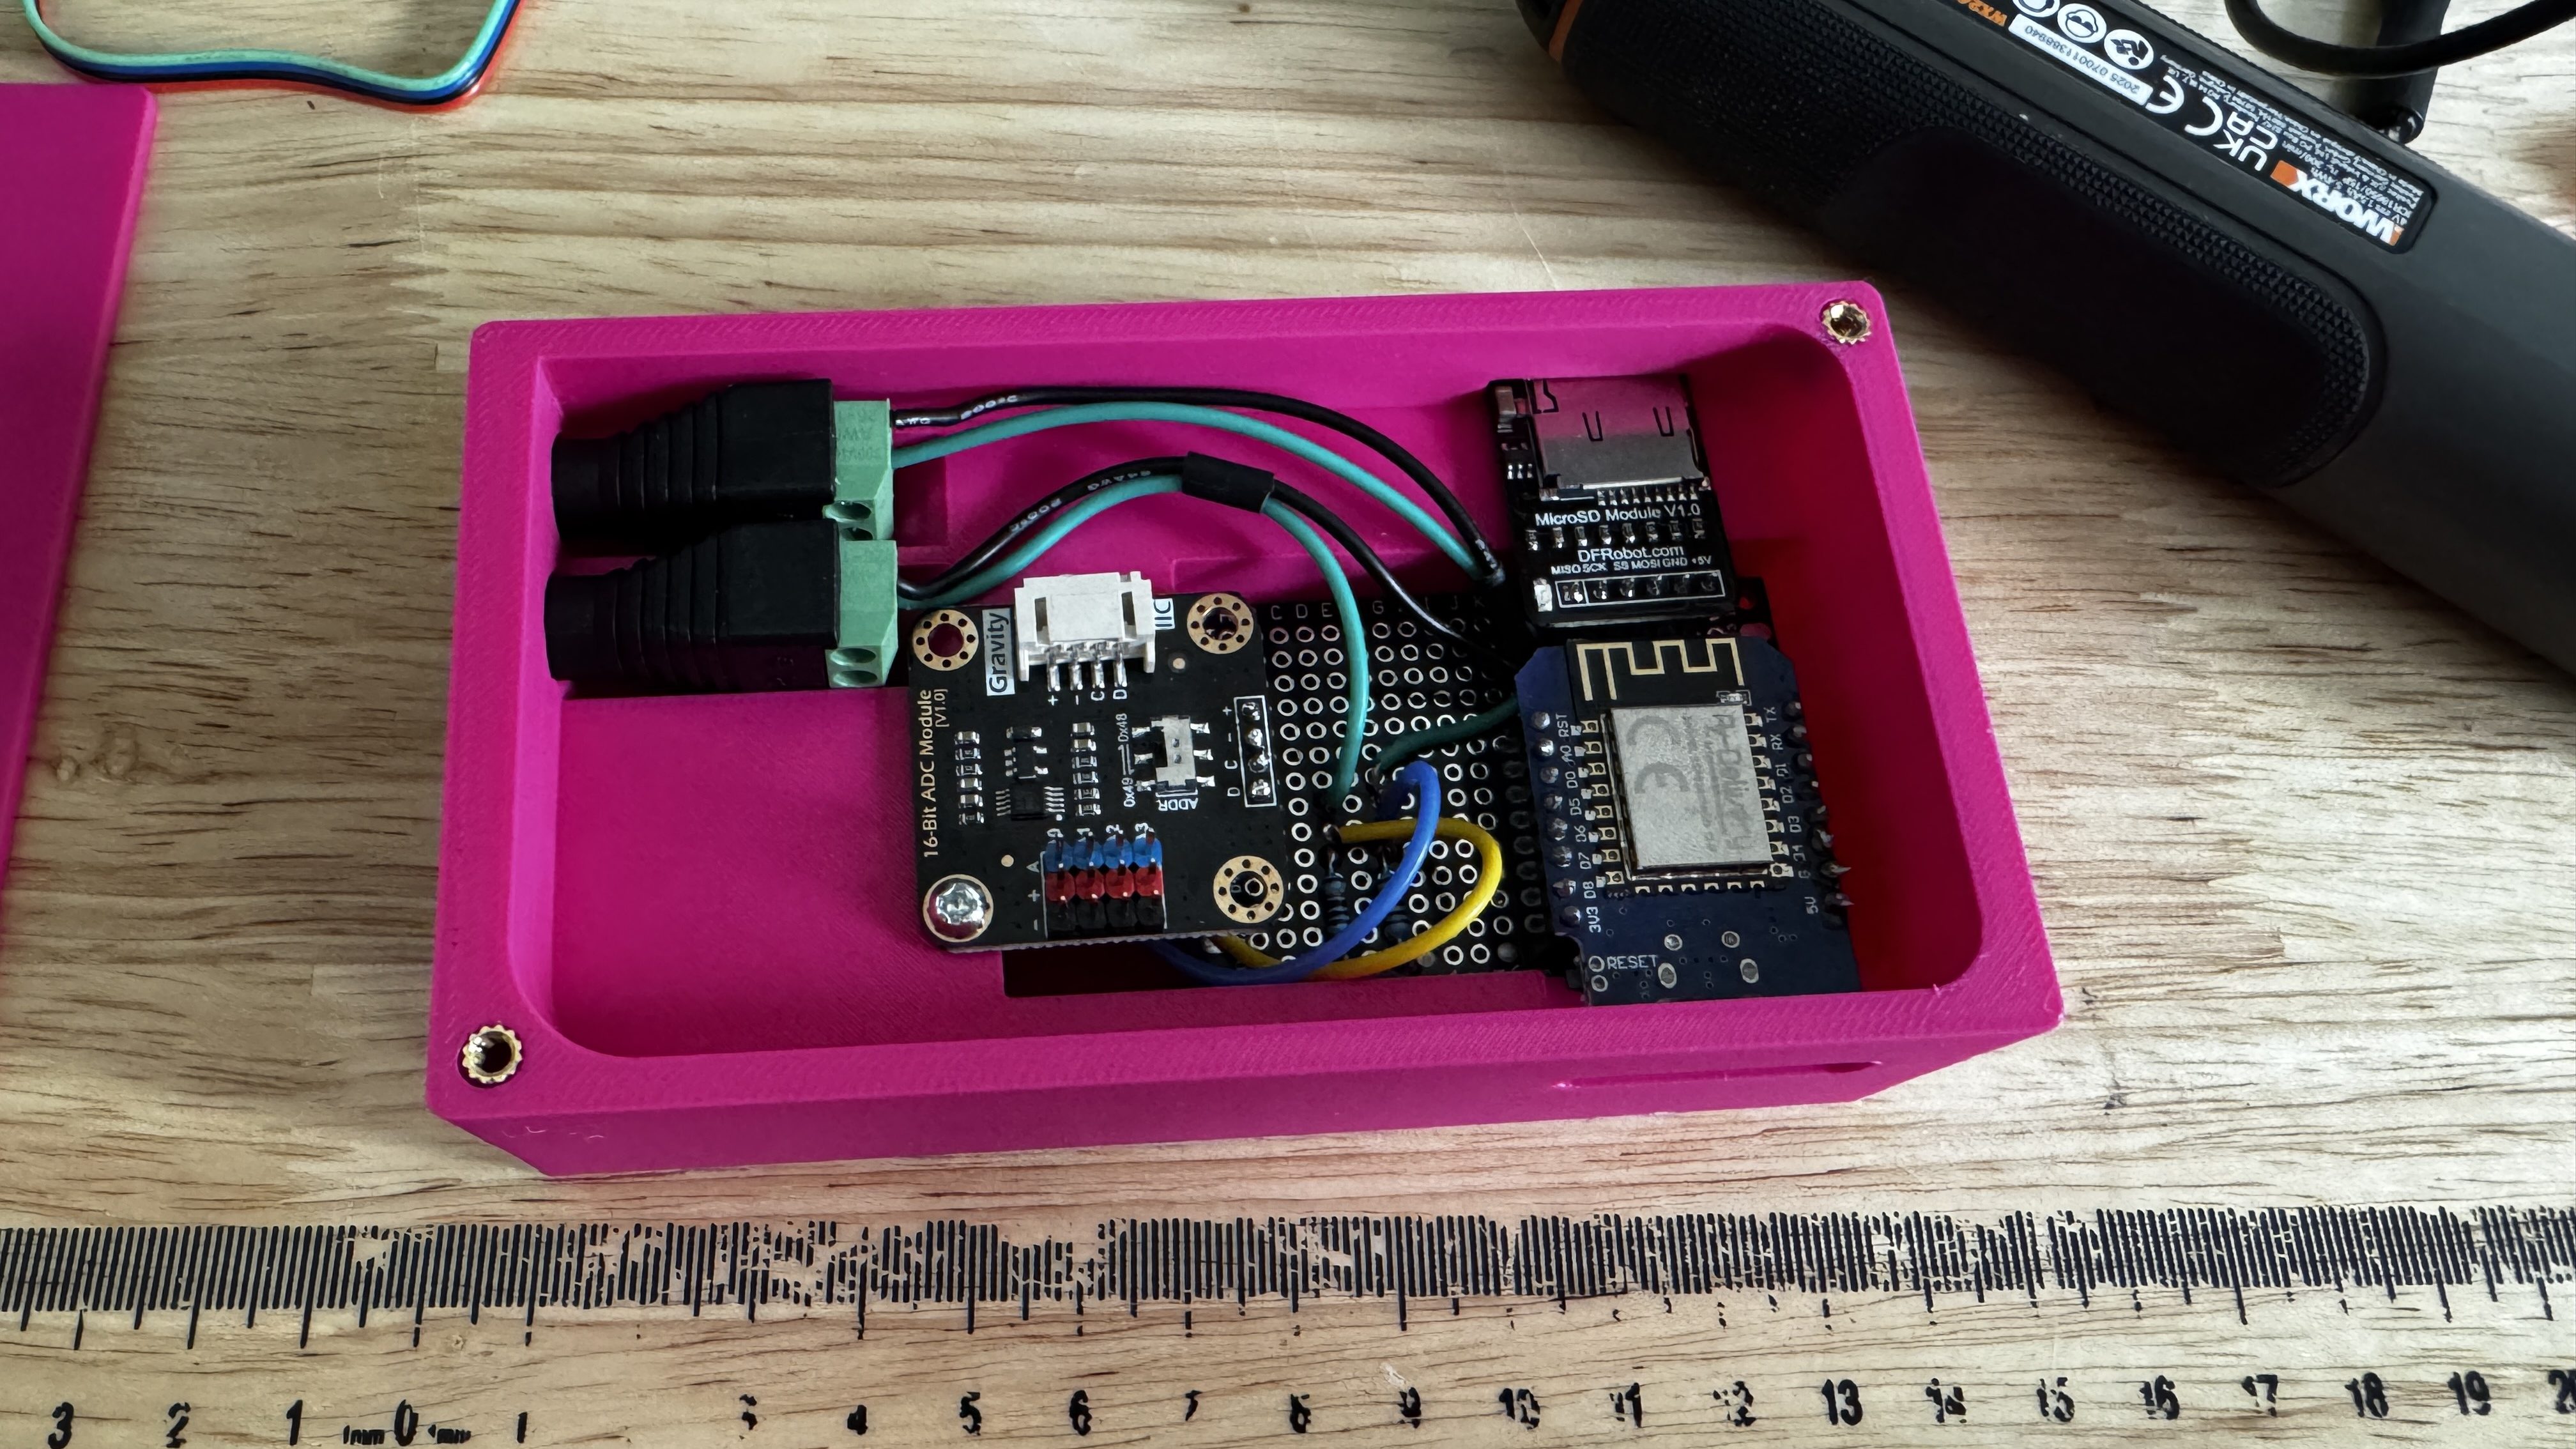
- Connect the hardware. Once the UI was right, I described my board and wiring layout to Claude and got it to write the firmware which I loaded up.
- Breadboard it first. Got it all connected on a breadboard, powered it up, connected to Wi-Fi. Worked first time. Only needed one quick fix, calibrating the probes because the readings were off. One question to Claude, sorted.
- Make it permanent. Once I knew everything worked, out came the soldering iron. The wiring probably took about an hour and a half, mostly because I redid a few bits to keep it tidy. No shortcuts (and claude cant do that yet…).
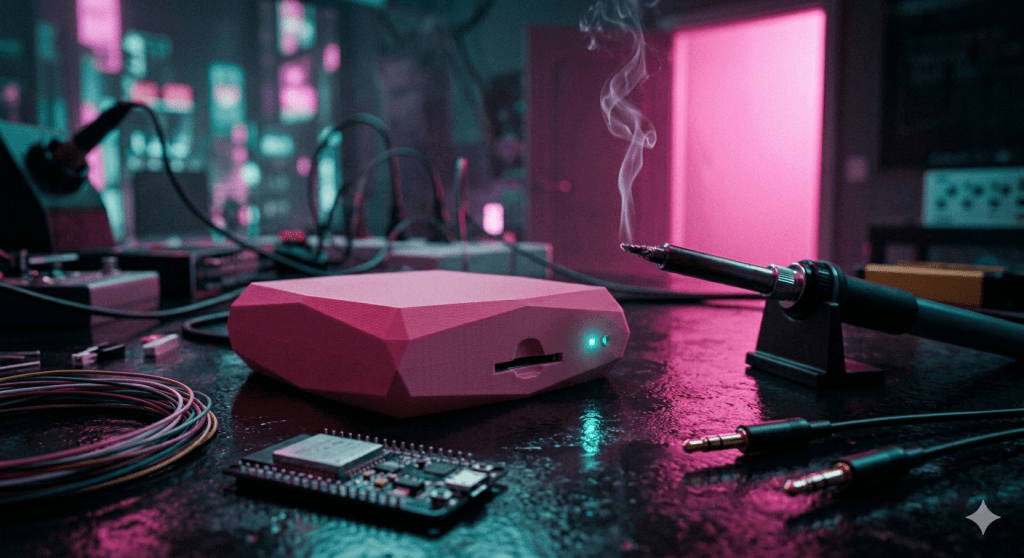
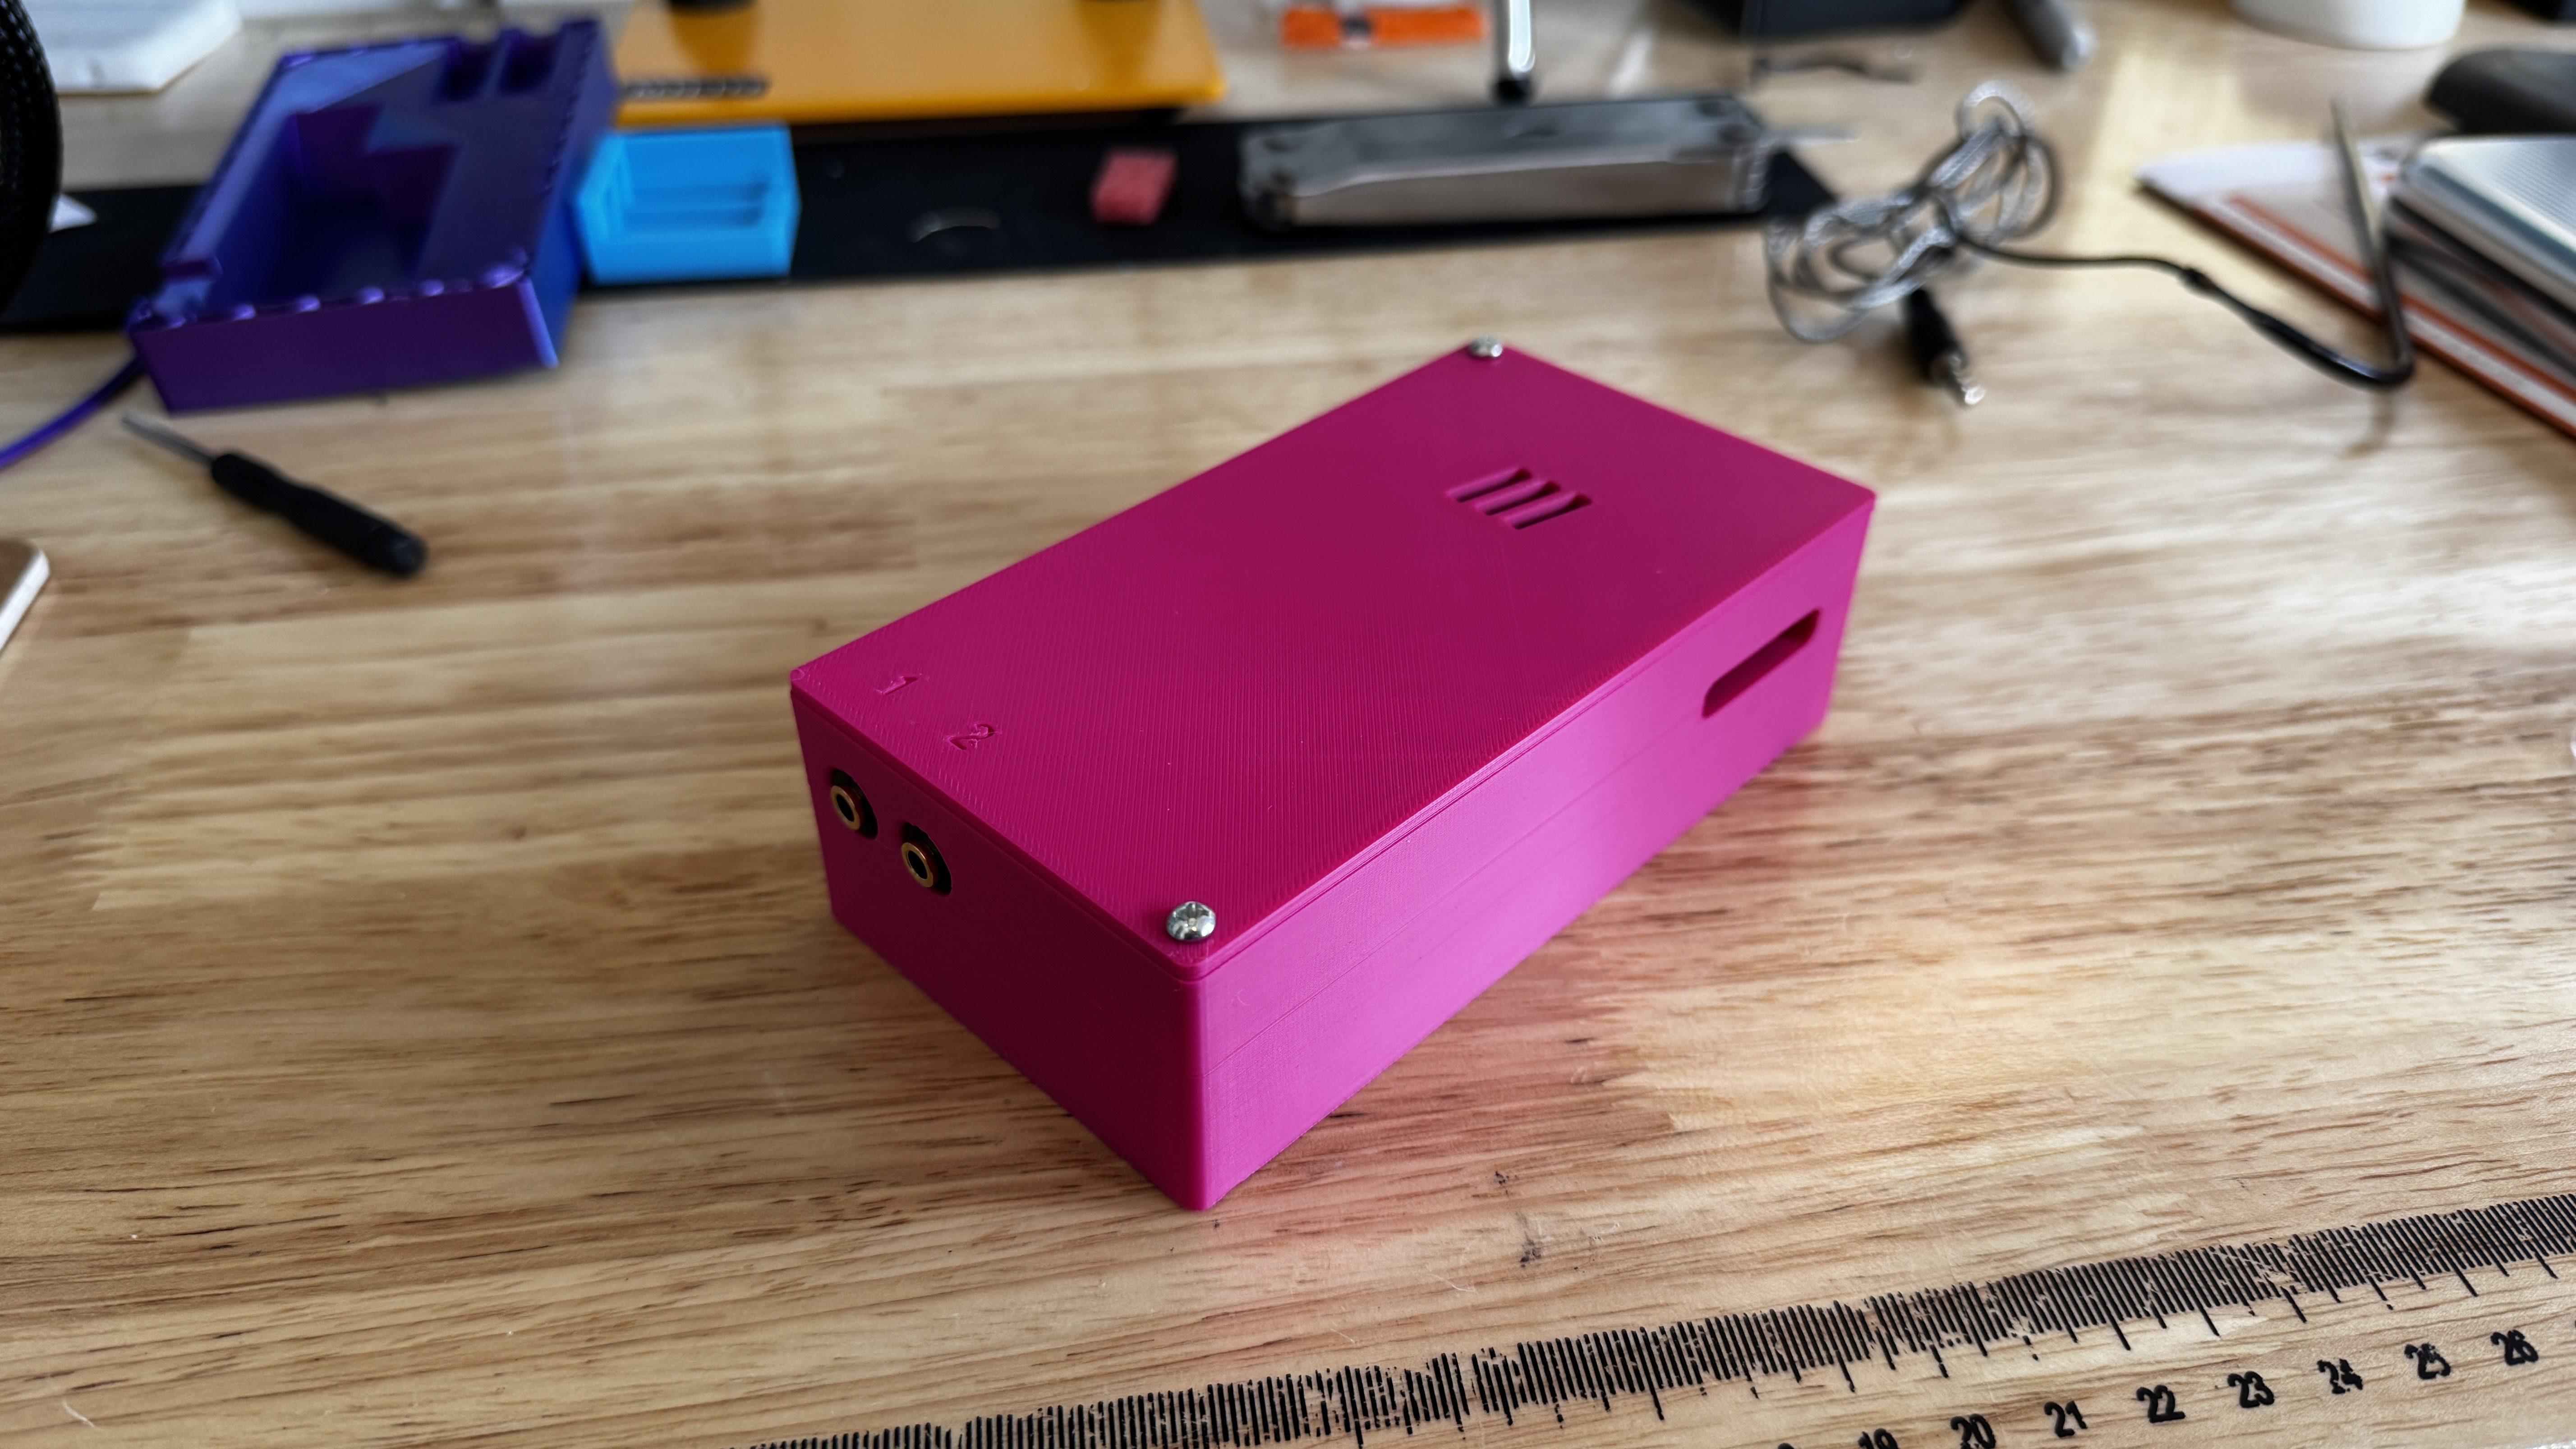
- Build the case. Designed it in Fusion 360, test printed a quick prototype to check fit, then printed the final case overnight.
Done.
It’s Not Perfect Yet (And That’s Fine)
The current version needs an external battery pack. It’s not a big deal, but version 2 will have an internal power supply built in. It’s already on the to-do list.
I’ve also kept it at two probes for now. It can do four if I need it, but two covers everything I cook at the moment.
The biggest limitation is honestly just that this kind of project requires some soldering. It’s not a no-code situation. But if you’re comfortable with a soldering iron and you’ve got a bit of patience, the barrier is lower than you’d think.
The Part I Keep Coming Back To
The thing I’m most pleased about isn’t the thermometer itself. It’s the workflow.
I keep a spec document that I update as the project evolves. I keep a to-do markdown file of things I want to change or add. When I want to make an improvement, I just open it up, tell Claude which item I want to tackle, and we build a plan. Done and dusted.
I now own a Wi-Fi BBQ thermometer that works exactly the way I want. It logs everything, it notifies me when I need to know something, and it costs me £20. When I want to add a feature, I just do it.
Can’t wait to give it a proper run this weekend.
Spec
If useful I have also included the spec that I used. I know its not perfect but it was good enough to get Claude to build the device i wanted. This is also an old one as I have made a couple of feature changes but its just hear for reference.
BBQ Wireless Probe Thermometer — Project Spec OverviewA wireless BBQ thermometer system built on an ESP8266 D1 Mini. Two NTC thermistor probes (meat and grill) are read via an ADS1115 ADC module and served as a live web dashboard over WiFi. Data is logged to an SD card. The device is battery powered and accessible to anyone on the same local network — no cloud, no app, just open a browser.--- Software We want to make sure we are using coding best practices. We have to make sure we are not going to have any techical debt We should be proud of this code it should be seen as well thought out and put together projectthe demo site for netlify is in the data folder. use the device/data for the live app's web interface code.--- Hardware Core Board| Component | Detail ||---|---|| MCU | AZDelivery D1 Mini (ESP8266-12F) || Flash | 4MB onboard (SPIFFS for web UI files) || WiFi | 802.11 b/g/n, 2.4GHz || Power | USB or battery pack via onboard regulator | Peripherals| Component | Purpose | Interface ||---|---|---|| ADS1115 module | 4-channel 16-bit ADC — reads both probes | I2C (D1/D2) || SD card module | Logs temperature data with timestamps | SPI (D5/D6/D7/D8) || 2x 3.5mm stereo jack sockets (panel mount) | Probe connectors | Analogue signal || 2x 100kΩ resistors | Voltage divider per probe | — || Battery pack | Portable power | — || Enclosure | Project box or 3D print | — | Probes Type: Morpilot NTC thermistor probes, 3.5mm TRS connector Resistance at 25°C: 100kΩ B-value: ~3950K Max rated temp: ~300°C (suitable for BBQ and oven use) Count: 2 Probe 1 — Meat Probe 2 — Grill / ambient--- Wiring Probe Voltage Divider (per probe)3.3V ──── 100kΩ ──── ADC input (ADS1115 channel) ──── Probe (NTC) ──── GNDThe 3.5mm jack Tip carries the thermistor signal; Sleeve is GND. Pin Assignments| D1 Mini Pin | Connected To ||---|---|| D1 (SCL) | ADS1115 SCL || D2 (SDA) | ADS1115 SDA || D5 (CLK) | SD card CLK || D6 (MISO) | SD card MISO || D7 (MOSI) | SD card MOSI || D8 (CS) | SD card CS || 3.3V | ADS1115 VDD, SD card VCC || GND | ADS1115 GND, SD card GND, probe sleeves | ADS1115 Channel Map| ADS1115 Channel | Probe ||---|---|| A0 | Probe 1 — Meat || A1 | Probe 2 — Grill |--- Firmware Platform Framework: Arduino (via Arduino IDE or PlatformIO) Board package: ESP8266 Arduino Core Key Libraries| Library | Purpose ||---|---|| ESP8266WiFi | WiFi connection || ESPAsyncWebServer | Async HTTP + WebSocket server || Adafruit_ADS1X15 | ADS1115 driver || SD | SD card read/write || LittleFS / SPIFFS | Serve web UI files from flash || ArduinoJson | JSON serialisation for WebSocket messages || TimeLib / NTP | Timestamps (sync via NTP on boot) | Core Loop On boot: connect to WiFi, sync time via NTP, mount SPIFFS and SD card, start web server and WebSocket handler. Every 1 second: read both ADS1115 channels, convert resistance → °C using Steinhart-Hart equation, push JSON payload to all connected WebSocket clients. Every 5 seconds: append a CSV row to the SD card log file. Web server serves static UI files from SPIFFS on port 80. Temperature ConversionUses the Steinhart-Hart simplified (B-parameter) equation:1/T = 1/T₀ + (1/B) × ln(R/R₀)Where: T₀ = 298.15K (25°C) R₀ = 100,000Ω B = 3950K R = measured resistance from voltage divider SD Card LoggingAll data is written under a /BBQ/ root folder on the SD card. This keeps the card organised and means a factory reset of the device never wipes historical data. Folder structure/BBQ/ logs/ log_2025-07-14.csv ← rolling temperature log, one file per day log_2025-07-15.csv cooks/ cook_2025-07-14T08-14-00.csv ← one file per cook session cook_2025-07-14T19-05-00.csv config/ settings.csv ← last-saved targets (persists across reboots) presets.csv ← user-defined preset temperatures favourites.csv ← saved favourite cook configs CSV formats/BBQ/logs/log_YYYY-MM-DD.csv — temperature log, appended every 5 s while device is on:timestamp,meat_c,grill_c2025-07-14T14:32:05,67.4,182.3/BBQ/cooks/cook_<ISO-datetime>.csv — one row per 30-second sample during an active cook session, plus header metadata rows prefixed with #:#name,Sunday Brisket#preset,Brisket / pulled pork#meat_target_c,95#grill_low_c,105#grill_high_c,130#started_at,2025-07-14T08:14:00elapsed_s,meat_c,grill_c0,18.0,115.230,18.3,118.6...#note,76m,Stall hit at 68°C. Spritzing with apple juice.#note,192m,Wrapped in butcher paper at 75°C./BBQ/config/settings.csv — single row, written on every target update so the last settings survive a reboot:meat_target_c,grill_low_c,grill_high_c74,160,200/BBQ/config/presets.csv — one row per preset, written when the user saves or deletes a preset:name,meat_target_cBeef — rare,52Beef — medium rare,57Chicken — safe minimum,74Brisket / pulled pork,95/BBQ/config/favourites.csv — one row per favourite, written on save/delete:name,meat_target_c,grill_low_c,grill_high_c,presetSunday Brisket,95,105,130,Brisket / pulled porkReverse Sear Ribeye,54,110,130,Beef — medium rare WebSocket Payload (JSON, pushed every 1s)json{ "ts": "2025-07-14T14:32:05", "meat": { "c": 67.4, "f": 153.3 }, "grill": { "c": 182.3, "f": 360.1 }, "eta_minutes": 42, "meat_target": 74.0, "grill_low": 160.0, "grill_high": 200.0}--- Web Dashboard AccessAny device on the same WiFi network opens http://<device-ip> in a browser. No login required. UI Layout (mobile-first, responsive)┌─────────────────────────────┐│ 🔥 BBQ Monitor │ ← header, device name, °C/°F toggle├──────────────┬──────────────┤│ MEAT PROBE │ GRILL PROBE │ ← large temp readouts│ 67.4°C │ 182.3°C ││ Target: 74° │ 160–200° │ ← targets, status indicator│ ETA: 42 min │ ✅ In range │├──────────────┴──────────────┤│ TEMP GRAPH │ ← Chart.js live scrolling graph│ both probes, last 60 min │├─────────────────────────────┤│ TARGET SETTINGS │ ← input fields, saved to localStorage│ Meat target: [____] °C ││ Grill low: [____] °C ││ Grill high: [____] °C │└─────────────────────────────┘ Colour Scheme| Token | Value | Usage ||---|---|---|| Background | #0d0d0d (near black) | Page background || Surface | #1a1a1a | Cards / panels || Primary | #ff4d8d (pink) | Highlights, active states || Text | #ffffff | Primary text || Text muted | #888888 | Labels, secondary info || Success | #4dff91 | In-range / target reached indicators || Warning | #ffcc00 | Grill out of range | Alerts (in-browser only, no push)| Condition | Behaviour ||---|---|| Meat probe reaches target | Card flashes pink, banner appears at top || Grill below low threshold | Grill card border turns yellow, label shows "TOO LOW" || Grill above high threshold | Grill card border turns yellow, label shows "TOO HIGH" || Probe disconnected | Reads shown as ---, card dims | Temperature Toggle Toggle button in header switches display between °C and °F. Default is °C. Preference saved in browser localStorage. Conversion applied client-side; all data from firmware is always in °C. ETA Prediction Calculated client-side from the last 10 minutes of meat probe readings. Uses linear regression on the rolling window to project a rate of change (°C/min). Displayed as "ETA: X min" or "ETA: < 1 min" when very close. Hidden if the meat probe temp is above the target or rate of change is flat/negative. Graph Rendered with Chart.js (served from SPIFFS, no CDN dependency). X-axis: rolling 60-minute window. Two lines: meat (pink) and grill (white). Target meat temp shown as a dashed pink horizontal line. Grill high/low shown as dashed white lines.--- File Structure SPIFFS (onboard flash — web UI)/data index.html style.css app.js chart.min.js SD Card (data logs)/BBQ/ logs/ log_2025-07-14.csv log_2025-07-15.csv cooks/ cook_2025-07-14T08-14-00.csv config/ settings.csv presets.csv favourites.csv Firmware/ bbq-thermometer.ino (or main.cpp for PlatformIO) thermistor.h Steinhart-Hart conversion logger.h SD card logging websocket_handler.h WebSocket push logic--- Target Settings Configured via the web UI, not hardcoded in firmware. Settings sent from browser to ESP8266 via WebSocket message on change. Stored in firmware memory (not persisted across power cycles in v1 — EEPROM persistence is a future enhancement).--- Power Powered by existing USB battery pack. No onboard LiPo management required for v1. Estimated current draw: ~80–120mA (WiFi active, ADS1115 + SD). A 10,000mAh pack gives an estimated 40–50 hours of runtime.--- Limitations & Future Enhancements| Item | Status ||---|---|| Target settings persist across reboot | v2 — EEPROM/NVS || Push notifications (phone, browser push API) | v2 — requires HTTPS + service worker || More than 2 probes | v2 — ADS1115 has 2 spare channels || OTA firmware updates | v2 || Historical log viewer in UI | v2 || Custom device name / mDNS (bbq.local) | v2 || PCB design | v3 |--- Bill of Materials (Estimated)| Item | Est. Cost ||---|---|| AZDelivery D1 Mini (owned) | — || Morpilot probes (owned) | — || Battery pack (owned) | — || ADS1115 module | ~£3 || SD card module | ~£2 || 2x 3.5mm stereo jack sockets | ~£2 || 2x 100kΩ resistors | <£1 || Perfboard + wire | ~£3 || Project enclosure | ~£5 || Total additional spend | ~£16 |Gravity: I2C ADS1115 16-Bit ADC Module https://thepihut.com/products/gravity-i2c-ads1115-16-bit-adc-module-arduino-raspberry-pi-compatible Sale price £14.90Fermion: MicroSD Card Module for Arduino (Breakout) £5 https://thepihut.com/products/microsd-card-module-for-arduino3.5mm 1/8" Stereo Audio Jack Terminal Block https://thepihut.com/products/3-5mm-1-8-stereo-audio-jack-terminal-block £2.40

Leave a comment